环境配置
以防你有网络问题下载工具:https://pan.baidu.com/s/1yuxPkDpCV8EVLkDubqiirg?pwd=apar
编程基础
阅读本教程你至少需要:
其他教程和mod模板
https://github.com/Alchyr/ModTemplate-StS2
https://github.com/freude916/sts2-quickRestart/blob/main/README.md
可以通过dotnet new install Alchyr.Sts2.Templates直接安装项目模板,具体查看ModTemplate-StS2。
安装Godot 4.5.1 Mono
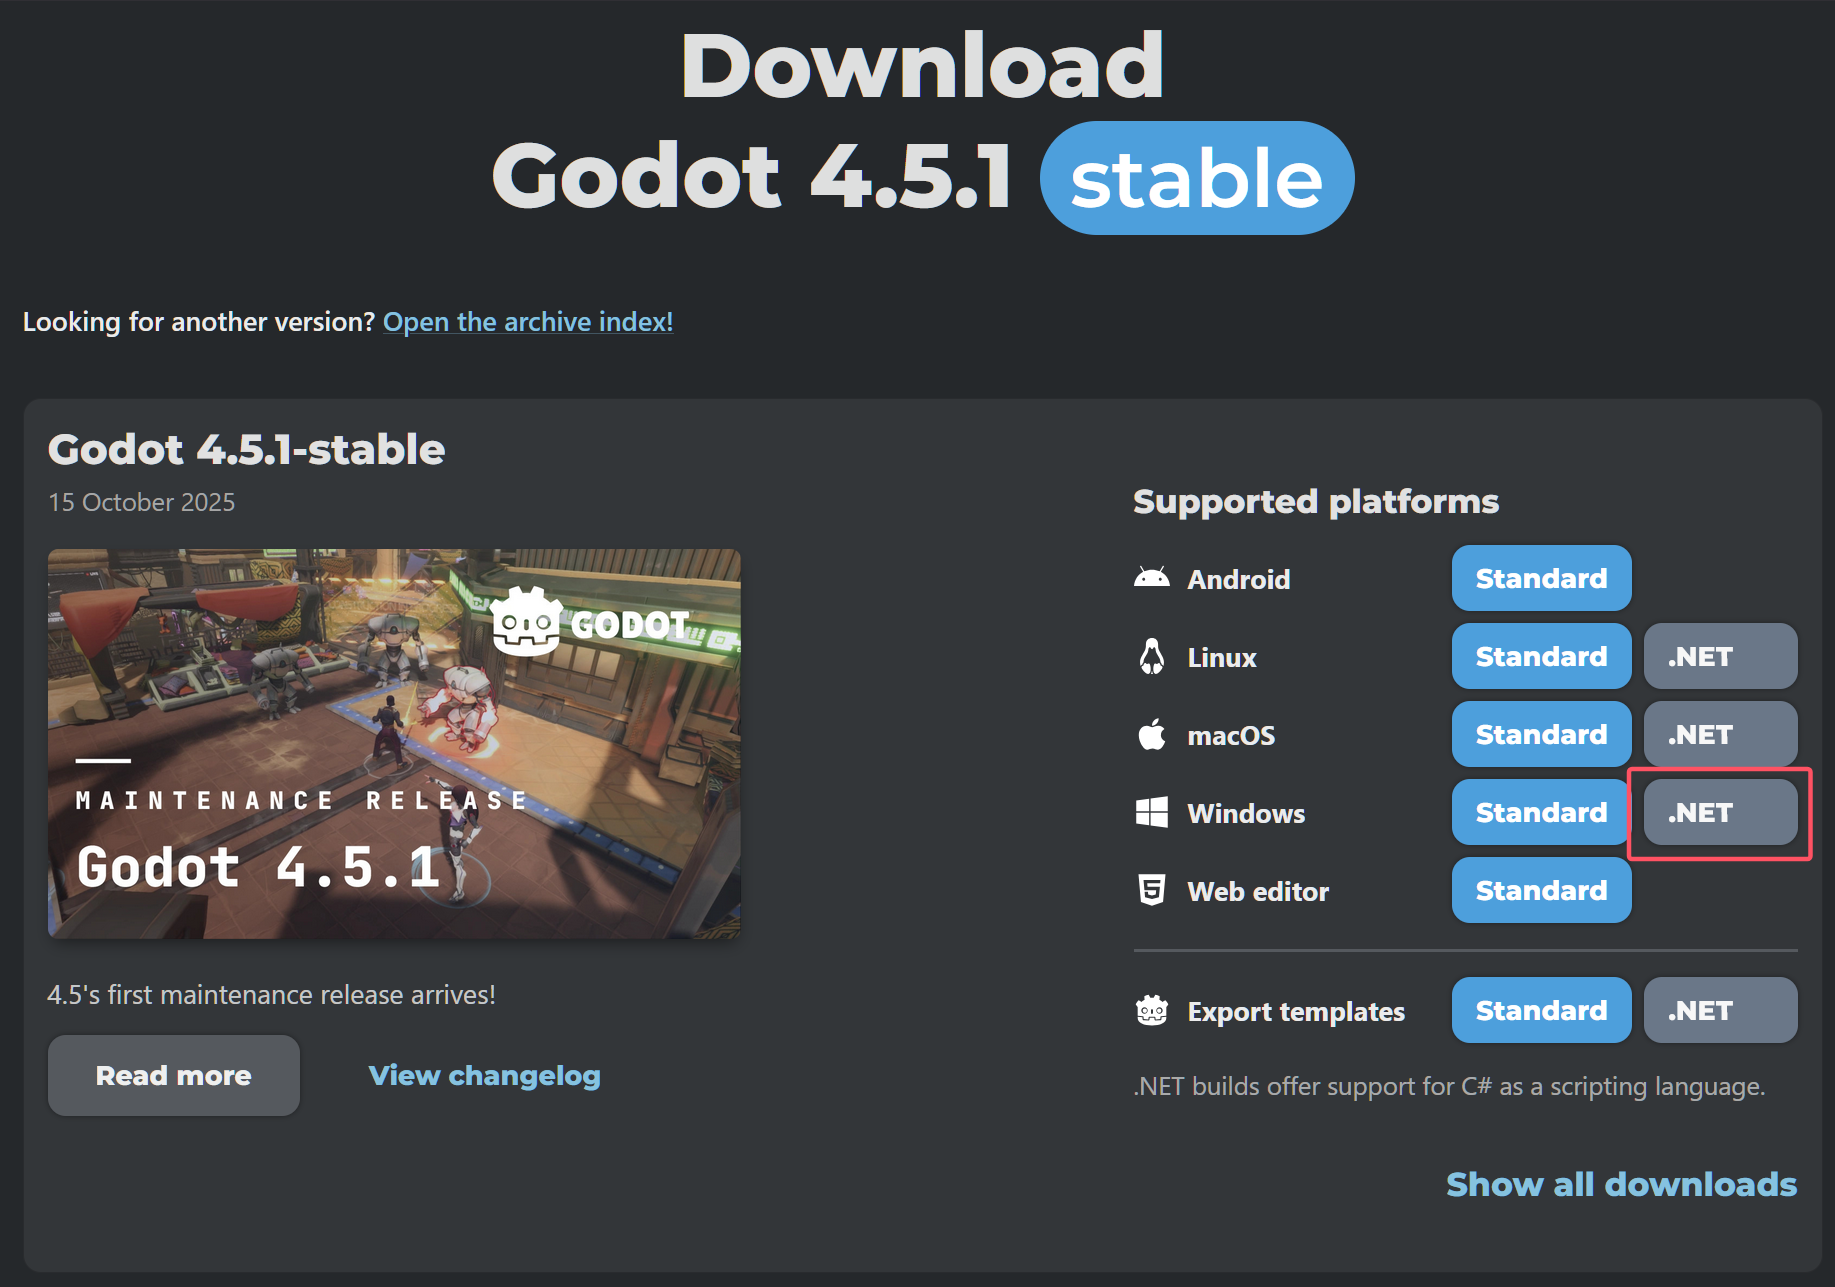
《杀戮尖塔2》是用Godot4.5.1 Mono开发的,所以你需要安装Godot4.5.1 Mono版本的编辑器。
进入Godot下载界面,下载并安装编辑器。注意选择.NET版本。
![alt text]()
或者,你也可以下载制作组自己使用的Godot修改版本MegaDot。由于暂不清楚这个版本和官方版本的区别,所以建议直接使用官方版本。
安装.NET SDK
下载一个.NET SDK,下载.NET 9以上版本。
选择文本编辑器
选择一个文本编辑器。可以使用Visual Studio Code或者Rider(强烈推荐新手使用Rider)。另外也可以使用Visual Studio等其他 IDE。以下只介绍 VS Code 的配置方法。
强烈推荐新手使用Rider
强烈推荐新手使用Rider
强烈推荐新手使用Rider
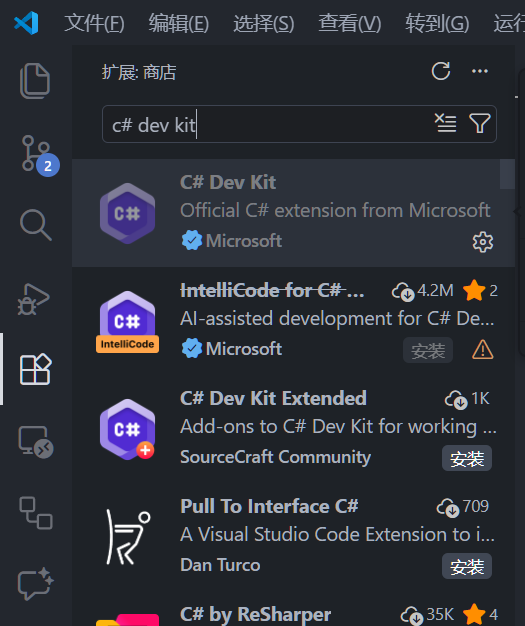
安装VS Code插件(可选)
安装C# Dev Kit。你还可以安装Godot Tools等插件。
记得打开设置把自动保存开了。
![alt text]()
参考官方文档
如有问题可以参考Godot的官方文档:C#开发环境配置。
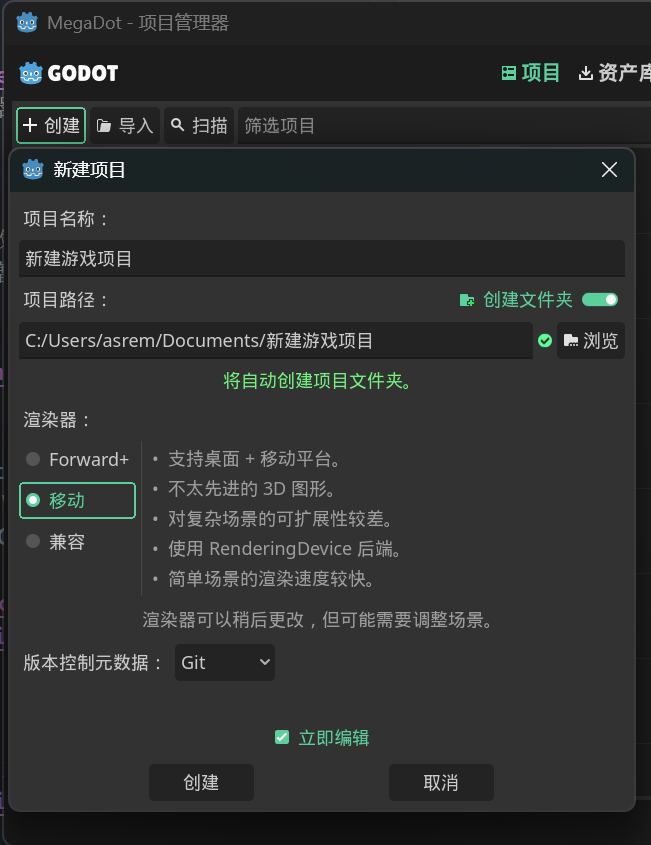
创建Godot项目
打开Godot创建一个新项目。渲染器尽量使用Mobile/移动,以和游戏保持一致。记住你的项目名。
![alt text]()
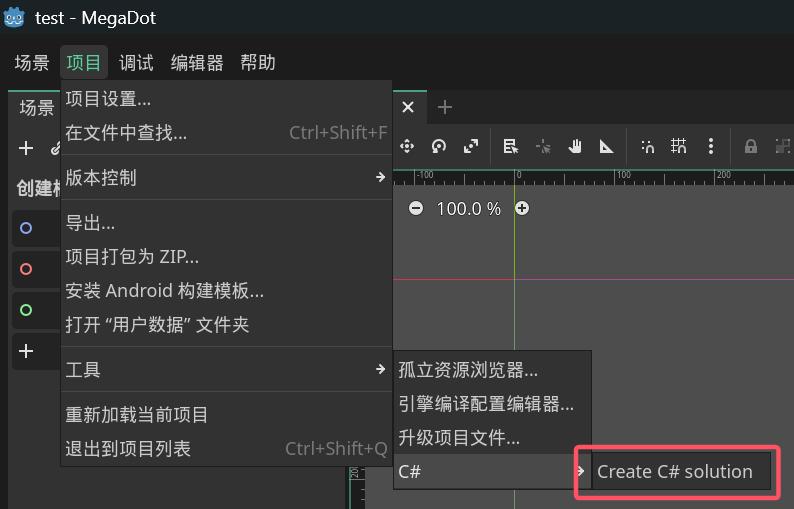
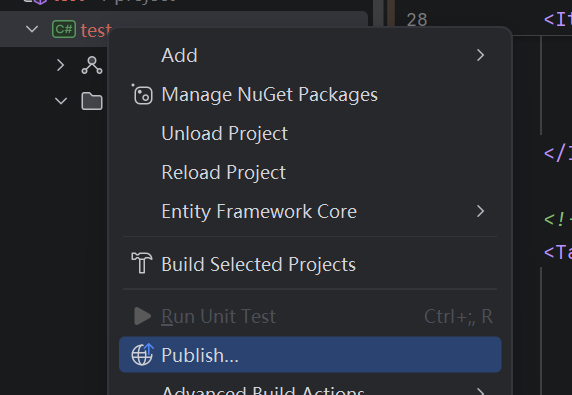
创建C#解决方案
点击左上角的“创建C#解决方案”按钮。
![alt text]()
创建{modid}.json
用你的IDE(VSCode、Rider、VS等)打开项目文件夹。创建一个新文件(双击资源管理器或者右键新建文件),名字为{modid}.json。modid建议和项目名以及其中内容相同。填写以下内容。
- 不是创建
{modid}.json这么一个文件,而是把{modid}替换成你的项目名,例如Test.json。之后提到的{} []都是替换。
1
2
3
4
5
6
7
8
9
10
11
12
| {
"id": "MyMod",
"name": "我的 Mod",
"author": "作者名",
"description": "Mod 描述",
"version": "0.1.0",
"min_game_version": "0.105.0",
"has_pck": true,
"has_dll": true,
"dependencies": [],
"affects_gameplay": true
}
|
1
2
3
| "dependencies": [
{ "id": "STS2-RitsuLib", "min_version": "0.2.27" }
],
|
修改.csproj
打开你的.csproj文件,修改并换成以下内容:
![alt text]()
1
2
3
4
5
6
7
8
9
10
11
12
13
14
15
16
17
18
19
20
21
22
23
24
25
26
27
28
29
30
31
32
33
34
| <Project Sdk="Godot.NET.Sdk/4.5.1">
<PropertyGroup>
<TargetFramework>net9.0</TargetFramework>
<ImplicitUsings>true</ImplicitUsings>
<LangVersion>12.0</LangVersion>
<Nullable>enable</Nullable>
<AllowUnsafeBlocks>true</AllowUnsafeBlocks>
<Sts2Dir>D:\xxx\Steam\steamapps\common\Slay the Spire 2</Sts2Dir>
<Sts2DataDir>$(Sts2Dir)\data_sts2_windows_x86_64</Sts2DataDir>
</PropertyGroup>
<ItemGroup>
<Reference Include="sts2">
<HintPath>$(Sts2DataDir)\sts2.dll</HintPath>
<Private>false</Private>
</Reference>
<Reference Include="0Harmony">
<HintPath>$(Sts2DataDir)\0Harmony.dll</HintPath>
<Private>false</Private>
</Reference>
</ItemGroup>
<Target Name="Copy Mod" AfterTargets="PostBuildEvent">
<Message Text="Copying mod to Slay the Spire 2 mods folder..." Importance="high" />
<MakeDir Directories="$(Sts2Dir)\mods\" />
<Copy SourceFiles="$(TargetPath)" DestinationFolder="$(Sts2Dir)\mods\$(MSBuildProjectName)\" />
<Copy SourceFiles="$(MSBuildProjectName).json" DestinationFolder="$(Sts2Dir)/mods/$(MSBuildProjectName)/" />
</Target>
</Project>
|
创建Entry.cs
创建一个Scripts文件夹,创建一个Entry.cs文件(两者命名随意,为了整洁美观)。内容改成以下:
建议命名空间第一段改成你自己的,不要用Test以免后续更改麻烦。另外不要忘记每个文件都加上namespace!
1
2
3
4
5
6
7
8
9
10
11
12
13
14
15
16
17
18
19
20
21
22
23
24
| using Godot.Bridge;
using HarmonyLib;
using MegaCrit.Sts2.Core.Logging;
using MegaCrit.Sts2.Core.Modding;
namespace Test.Scripts;
[ModInitializer(nameof(Init))]
public class Entry
{
public static void Init()
{
var harmony = new Harmony("sts2.reme.testmod");
harmony.PatchAll();
ScriptManagerBridge.LookupScriptsInAssembly(typeof(Entry).Assembly);
Log.Info("Mod initialized!");
}
}
|
构建DLL
终端命令行里(找到Terminal按钮,或者快捷键,VSCode为按下ctrl+~,Rider为按下Alt+F12)输入dotnet build(或者vscode按下ctrl+shift+b选择dotnet: build,rider点击菜单构建)创建dll文件。由于之前.csproj文件的配置,dll文件自动复制到游戏根目录的mods文件夹里了。
导出PCK
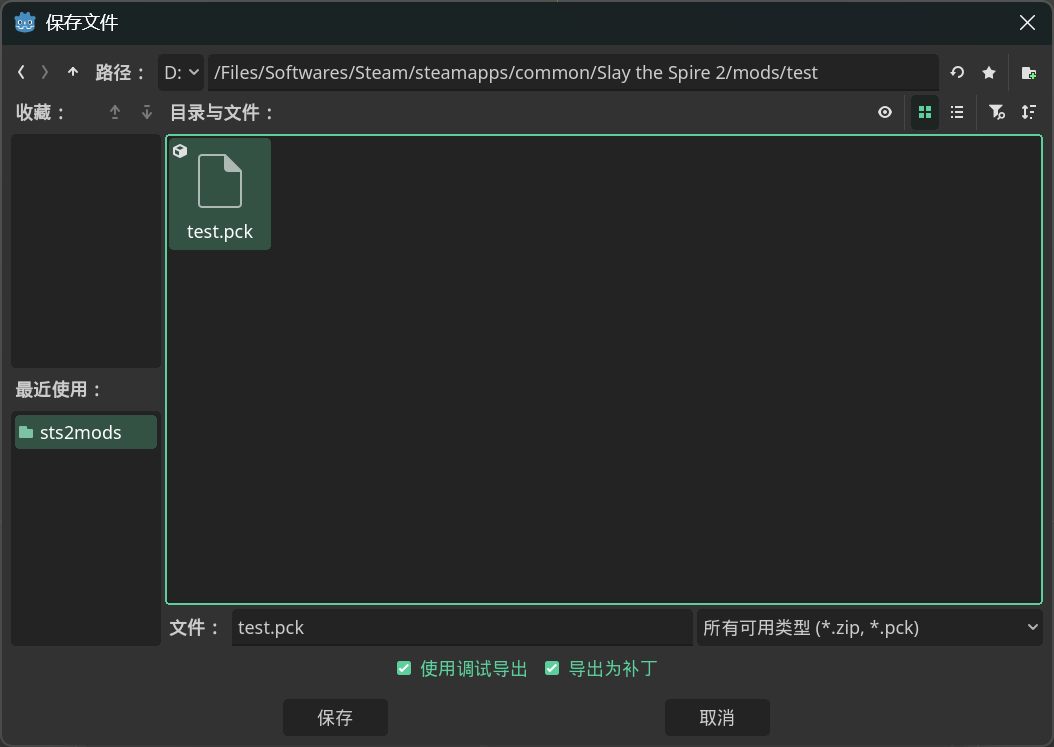
回到Godot编辑器,点击项目→导出,点击上方的添加一个windows预设,然后
点击导出pck/zip,把文件名字改成[项目名].pck。
文件夹选择你之前导出的dll同名目录。
注意一定得是pck!!!
可选:由于现在不需要pck里包含mod_manifest.json了,在导出选项里点击资源,从项目中排除文件或目录,填写{modid}.json,modid填你自己的,不要写{modid}。
建议之后通过之后的自动打包进行。如果要兼容mac平台见下:
用文本编辑器打开export_presets.cfg,将binary_format/architecture="x86_64"改为binary_format/architecture="msil"。
![alt text]()
![alt text]()
了解导出结果
现在你的mods文件夹里有一个你的mod命名的文件夹,里面有一个dll文件、一个pck文件和一个json文件,这三个文件是构成一个mod的组件。
- dll文件是mod的代码。如果你没有代码,可以不要。如果你之后改动了代码,只要重新build一下就行。
- pck文件是mod的素材资源。如果你没有素材,可以不要。如果你没有素材上的变动,不需要重新打包一次pck。
- json文件是mod的配置文件,是必须的。
运行并验证
运行游戏。第一次会提示是否开启mod,选择是,然后游戏会关闭,打开第二次即可,如果右下角显示“已加载模组”即加载成功。如果发现存档丢失,看下一章。
Rider不启动Godot打包(可选)
Godot支持命令行导出pck(首先你需要添加一个导出配置),例如使用终端命令:"{你的godot.exe的路径}" --headless --export-pack "{你的导出配置的名字,例如Windows Desktop}" "{杀戮尖塔根目录}/mods/{你的modid}/{你的modid}.pck",参考 https://docs.godotengine.org/zh-cn/4.x/tutorials/editor/command_line_tutorial.html#exporting 。你可以把这个命令保存成一个cmd或者csproj里的target。
打开你的csproj并新增以下内容:
1
2
3
4
5
6
7
8
9
10
11
12
13
14
15
16
17
18
19
20
21
22
23
24
25
26
27
28
29
30
31
32
33
34
35
36
37
38
39
40
41
| <Project Sdk="Godot.NET.Sdk/4.5.1">
<PropertyGroup>
<TargetFramework>net9.0</TargetFramework>
<ImplicitUsings>true</ImplicitUsings>
<LangVersion>12.0</LangVersion>
<Nullable>enable</Nullable>
<AllowUnsafeBlocks>true</AllowUnsafeBlocks>
<Sts2Dir>D:/Files/Softwares/Steam/steamapps/common/Slay the Spire 2</Sts2Dir>
<GodotExe>D:/Files/Projects/godot/Godot_v4.5.1-stable_mono_win64/Godot_v4.5.1-stable_mono_win64/Godot_v4.5.1-stable_mono_win64.exe</GodotExe>
<Sts2DataDir>$(Sts2Dir)/data_sts2_windows_x86_64</Sts2DataDir>
</PropertyGroup>
<ItemGroup>
<Reference Include="sts2">
<HintPath>$(Sts2DataDir)/sts2.dll</HintPath>
<Private>false</Private>
</Reference>
<Reference Include="0Harmony">
<HintPath>$(Sts2DataDir)/0Harmony.dll</HintPath>
<Private>false</Private>
</Reference>
</ItemGroup>
<Target Name="Copy Mod" AfterTargets="PostBuildEvent">
<Message Text="Copying mod to Slay the Spire 2 mods folder..." Importance="high" />
<MakeDir Directories="$(Sts2Dir)/mods/" />
<Copy SourceFiles="$(TargetPath)" DestinationFolder="$(Sts2Dir)/mods/$(MSBuildProjectName)/" />
<Copy SourceFiles="$(MSBuildProjectName).json" DestinationFolder="$(Sts2Dir)/mods/$(MSBuildProjectName)/" />
</Target>
<Target Name="ExportPck" AfterTargets="Publish">
<Message Text="Copying PCK to Slay the Spire 2 mods folder..." Importance="high" />
<Exec Command=""$(GodotExe)" --headless --export-pack "Windows Desktop" "$(Sts2Dir)/mods/$(MSBuildProjectName)/$(MSBuildProjectName).pck""
EnvironmentVariables="IsInnerGodotExport=true;MSBUILDDISABLENODEREUSE=1"
ContinueOnError="WarnAndContinue" />
</Target>
</Project>
|
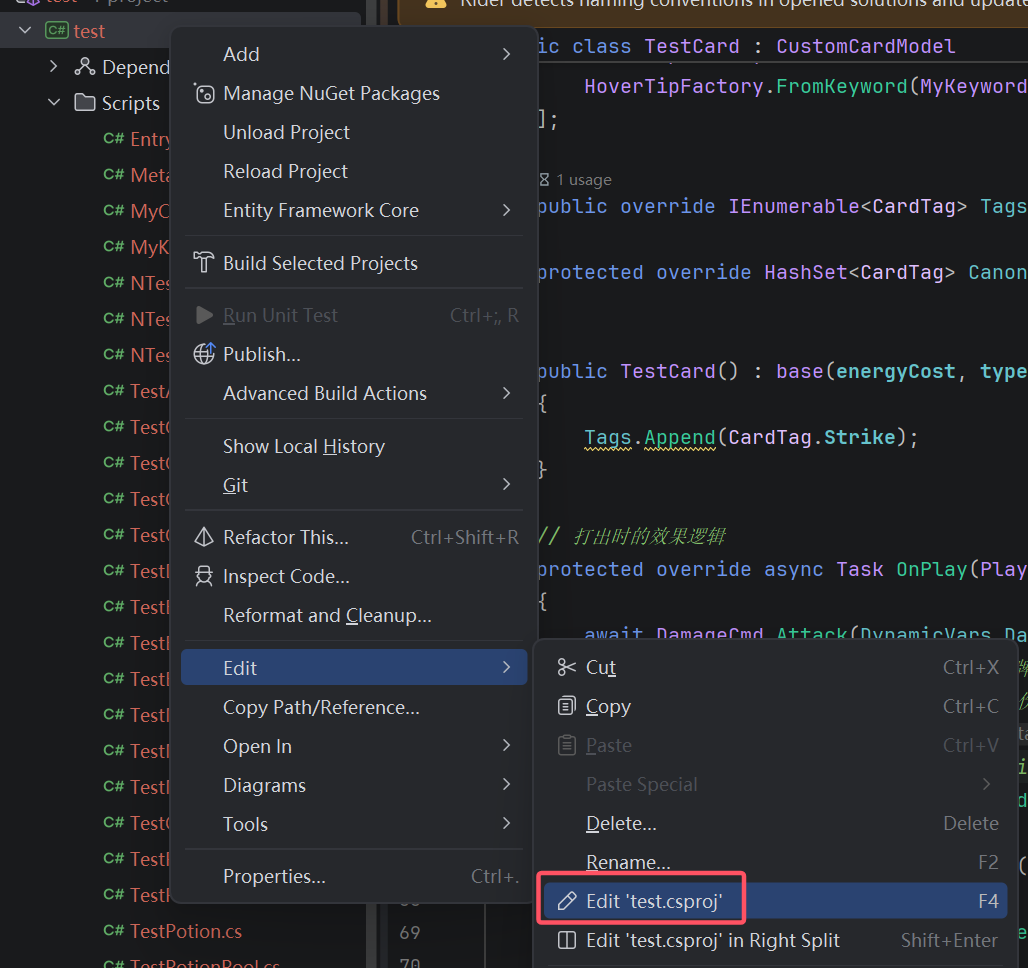
然后右键你的项目点击Publish即可。一路点OK就行。
![alt text]()
VSCode不启动Godot打包(可选)
例如在你的.csproj文件里添加GodoExe和ExportPck的内容:
1
2
3
4
5
6
7
8
9
10
11
12
13
14
15
16
17
18
19
20
21
22
23
24
25
26
27
28
29
30
31
32
33
34
35
36
37
38
39
40
41
| <Project Sdk="Godot.NET.Sdk/4.5.1">
<PropertyGroup>
<TargetFramework>net9.0</TargetFramework>
<ImplicitUsings>true</ImplicitUsings>
<LangVersion>12.0</LangVersion>
<Nullable>enable</Nullable>
<AllowUnsafeBlocks>true</AllowUnsafeBlocks>
<Sts2Dir>D:/Files/Softwares/Steam/steamapps/common/Slay the Spire 2</Sts2Dir>
<GodotExe>D:/Files/Projects/godot/Godot_v4.5.1-stable_mono_win64/Godot_v4.5.1-stable_mono_win64/Godot_v4.5.1-stable_mono_win64.exe</GodotExe>
<Sts2DataDir>$(Sts2Dir)/data_sts2_windows_x86_64</Sts2DataDir>
</PropertyGroup>
<ItemGroup>
<Reference Include="sts2">
<HintPath>$(Sts2DataDir)/sts2.dll</HintPath>
<Private>false</Private>
</Reference>
<Reference Include="0Harmony">
<HintPath>$(Sts2DataDir)/0Harmony.dll</HintPath>
<Private>false</Private>
</Reference>
</ItemGroup>
<Target Name="Copy Mod" AfterTargets="PostBuildEvent">
<Message Text="Copying mod to Slay the Spire 2 mods folder..." Importance="high" />
<MakeDir Directories="$(Sts2Dir)/mods/" />
<Copy SourceFiles="$(TargetPath)" DestinationFolder="$(Sts2Dir)/mods/$(MSBuildProjectName)/" />
<Copy SourceFiles="$(MSBuildProjectName).json" DestinationFolder="$(Sts2Dir)/mods/$(MSBuildProjectName)/" />
</Target>
<Target Name="ExportPck">
<Message Text="Copying PCK to Slay the Spire 2 mods folder..." Importance="high" />
<Exec Command=""$(GodotExe)" --headless --export-pack "Windows Desktop" "$(Sts2Dir)/mods/$(MSBuildProjectName)/$(MSBuildProjectName).pck""
EnvironmentVariables="IsInnerGodotExport=true;MSBUILDDISABLENODEREUSE=1"
ContinueOnError="WarnAndContinue" />
</Target>
</Project>
|
然后控制台输入dotnet build -t:ExportPck即可连PCK一起导出。输入dotnet build仅编译dll。
方法不限。你也可以使用tasks.json和publish(modtemplate使用的)。
mac支持(可选)
用文本编辑器打开export_presets.cfg,将binary_format/architecture="x86_64"改为binary_format/architecture="msil"。